In this article, you will learn to setup WooCommerce event tracking and send your event data to marketing tools like Google Analytics and Facebook.
Step 1: Account setup
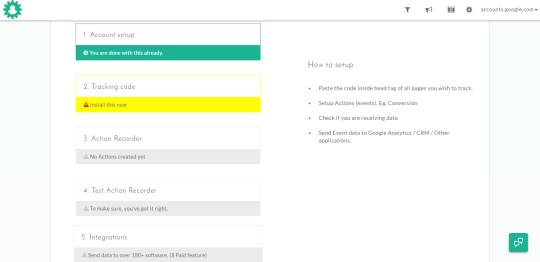
Setting up an account with Action Recorder is very easy, it just takes you few seconds.

Step 2: Tracking code
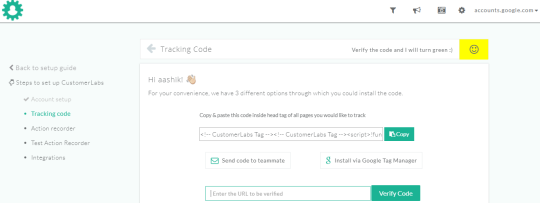
On clicking tracking code. You will get a unique code, simply paste that code into your WooCommerce store.

To do that go to admin panel of your WordPress, Appearance>Editor>Your website code appears here.
Paste your unique code under the <head tag> and click on save. Enter your store’s URL in Action recorder and click on verify code.

You will get this message, once your account is verified.
Step 3: Set up tracking in E-commerce website
Now, you are all set to record your actions using Action Recorder. Here, I’m going to show you to record actions for the following events 1.Add to cart, 2.Checkout made 3.Removed from cart 4.Search made
1. WooCommerce Add To Cart event tracking
To track add to cart event, choose action name as “ADD TO CART”.

Click on pointing symbol manually and choose “Add to cart”, as it is done below.

Next step is selecting your attribute. For this below example, I need the name and price of the specific product which is been sent to cart, choose accordingly.

For this, I want to track Add to cart button in Woocommerce store for all the products. So that I could get the name and price of the specific product that has been sent to cart.

Click on save, Once you are done. The WooCommerce Add to cart event is now set with Action Recorder.
2. WooCommerce Checkout Made
To track checkouts, click on “CHECKOUT MADE” as the Action name.

Click on pointing symbol manually and select “check out”, as it is done below.

Next step is selecting the attribute. For this below example, I need specific product’s name which is been sent to “check out”, choose accordingly.

Click on pointing symbol manually and select the product name. As it is done below.

For this, I want to track WooCommerce checkout page event for all the products in my store. So that, I could get the name of the specific product that has been sent to checkout.checkout.

Click on save, Once you are done. The WooCommerce checkout made the event is now set with Action Recorder.
3.WooCommerce Empty Cart
To track items removed from cart choose “REMOVED FROM CART” as the action type.

Click on pointing symbol manually and select “Remove” as shown below.

Next step is selecting the attribute. For this below example, I need specific product’s name which is been removed from the cart, choose accordingly.cart, choose accordingly.

Click on pointing symbol manually and select product name.

For this, I want to track “ Removed from cart” event for all the products in my WooCommerce store. So that I could get the name of the specific product that has been removed from the cart, choose accordingly.

Click on save, once you are done. The Woocommerce abandoned cart event is now set with Action Recorder.
4.WooCommerce Search Made
To record searches made on your WooCommerce store, select action name as “search made”.

Choose action type as the pageview, Once you are done click on Add Details.

Next step is selecting the attribute. Choose URL Query, search string, and type q and click on verify.
On clicking save, you can find your saved attributes as it is shown below.

In order to track searches throughout your WooCommerce store, choose all pages.

Click on save, Once you are done. WooCommerce product search event is now set with Action Recorder.
Step 4: Test Action Recorder
The next step is to test your Action Recorder. Your Action names and Action types will differ based on what you chose previously.

In order to test this, if it is working open your WooCommerce store in the new window and click on the events which you just set for tracking.
Case 1: Add To Cart
On clicking “Add to cart” on any of your products in your WooCommerce store, you will get the live data of the specific product which is been sent to cart. As shown below.

Case 2: Removed From Cart
On clicking “remove from cart” on any of your products in your WooCommerce store, you will get the live data of the specific product which is been removed from the cart.

Case 3: Checkout Made
On clicking checkout on any of your products in your WooCommerce store, you will get the live data of the specific product that is been sent to checkout.

Case 4: Search Made
On searching something in your WooCommerce store’s search bar, you will get the exact search term that is been typed. As it is shown below.

Step 5: WooCommerce Google Analytics Integration
In order to get your Google Analytics Tracking code, Go to settings in admin panel>Tracking info>Tracking code. Your unique Tracking ID displays here.
To Customize Google Analytics with Action Recorder, you need to follow these steps.

Configuration settings.

a.Paste your Google Analytics tracking ID
b.Enable your enhanced E-commerce setting
c.Set action category

Google Analytics integration with your WooCommerce store now complete. Now, you could finally track all your events that have been sent to Analytics.
Step6: Woocommerce Facebook Integration
In order to create a Facebook tracking Pixel, Go to Facebook Pixel Tab in Ads Manager>Click Create Pixel>Name your Pixel>Create pixel.
To Customize Facebook with Action Recorder, you need to follow these steps.

Configuration settings

Paste your Facebook Pixel ID and click on save.

Facebook Integration with your WooCommerce store is now complete. Now, you could finally track all your events that have been sent to Facebook.
Try Action Recorder, if you need any help do let me know. Happy to help you.

